Customized according to needs, optional Material, Door & Lock etc.
Contact Us NowHome / News / Industry news
Industry news
Jul 21,2025
By:Shinging
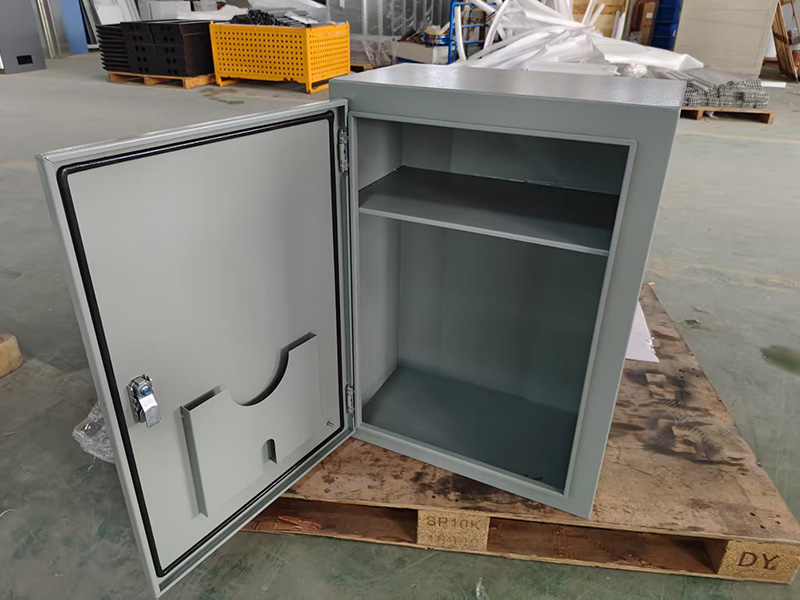
Interested in learning how to install a junction box? A junction box is a plastic enclosure or IP box utilized to protect the electrical wires. The box is generally attached to walls, horizontal surfaces, or comparable structures.
An electrical junction box includes the junction, referred to as a splice, of multiple cables. The cables should be fastened to the box with cable clamps and, at times, conduit fittings. The junction box comes with a cover that securely encloses your wires.
Junction boxes should always be kept readily accessible. Furthermore, a junction box must not be concealed with drywall (or any other surface material). This box is essential as it safeguards your electrical connections and reduces the likelihood of a fire hazard.
In this document, we will offer a detailed, step-by-step procedure for installing an electrical junction box. However, initially, let's examine the risks associated with an improper installation.
The Hazards of Improperly Installing a Junction Box
Numerous business owners might set up junction boxes independently, but there are risks associated with incorrect installation. Every box should be installed in compliance with the National Electrical Code. Adhering to this code is crucial for safeguarding you and your belongings. For example, overloading your junction box with excessive wires is not advisable. Excessive wires within the box can cause overheating and create short-circuiting problems. However, it can also result in an electrical fire.
The box should be installed correctly with the drywall. Otherwise, materials such as wood become uncovered and may cause sparks. If you fail to install your junction box correctly, you expose yourself, your business, and your property to risk.
Things to Consider Before You Begin Setting up an electrical junction box includes several important steps.
Before you begin, there are a few important points to understand:
Junction box openings: Utilize the existing openings of the junction box to attach it and fasten it to the wall.
Wire strippers: You must use wire strippers to remove 3/4 inch of casing insulation from the end of each wire that you'll be installing in the junction box.
Wires of the same color: You must twist together the exposed ends of wires that are the same color. Use pliers to accomplish this task. To join several wires together, utilizing a wire nut is the optimal choice.
Closing the box: While closing your junction box, press all the wires into the box. Once you've completed this, you can switch on the power and check your electrical system.
Step 1: Selecting the Right Box for Your Requirements
Prior to taking any action, selecting the appropriate junction box is vital for a successful installation. A junction box placed outdoors will need specific weatherproofing to function properly. NEMA 4x enclosures, built for outdoor use, feature gaskets that stop moisture from entering and reduce the chances of sparks or fire.
Another aspect to think about is the dimensions of the box you require. Your junction box must be large enough to accommodate the required number of wiring connections. A tiny box will probably handle splicing two cables but not beyond that. A big box could manage up to four to six cables.
If you're unsure about which size to select, opting for a larger one is advisable for a successful installation.
Step 2: Get Ready for Your Box Setup
Prior to beginning any installation procedure, switch off the power to the circuit you are handling. Locate your service panel and turn off the appropriate circuit breaker. This will guarantee that you are operating safely. Determining whether all power has exited the wires by yourself isn't always simple. Employing a non-contact voltage tester will aid in identifying if any voltage remains.
Step 3: Collect All Required Gear
Specific tools and supplies will be required to set up your box. Let’s examine all the essentials you'll require to begin.
Gear
Voltage tester without contact
Mallet
Screwdriver
Pincers
Drill later and screwdriver head
Cable cutters
Substances
Electrical box/cover approved by code
Timber screws
Cable fasteners
Electrical connectors
Step 4: Inicia el Proceso de Montaje
It's time to begin the installation procedure. Prior to installing your junction box, you'll need to disconnect the wires at their existing splice. Make sure to relax the cables if needed. This enables you to create space for the junction box.
Then, you will have to attach the box to the framework. For this, take screws and insert them into the existing holes. These holes can be located on the rear or side of the junction box.
What Happens If I Own a Metal Box?
Is your junction box constructed of metal? In that case, you must detach the metal disc from the box of every cable that is required to go through the hole. With the assistance of a screwdriver or hammer, you can effortlessly push out each metal disc and then twist it off using pliers. This step must be completed prior to disconnecting the circuit wires.
Step 5: Get Your Cable Clamps Ready
Every cable will need a clamp. If your junction box is plastic, then you won’t find metal discs. However, they do include internal cable clamps. Metal containers usually utilize internal fasteners. However, if your metal box lacks any clamps, you can attach a locknut-style clamp for each cable.
Pass the threaded end of the clamp through one of the openings, and fasten the clamp within the box using the ring-shaped nut. Finally, secure the nut using pliers.
Step 6: Asegura tus cables
The next step is to fasten your cables. Begin by gently inserting the cables through the clamps and into the enclosure. Note that the cable covering must extend 1/4 to 1/2 inch into the box and past the clamp. The wires that are being connected usually extend roughly 6 inches into the box.
You may also have to cut the wires. You may also need to remove 3/4 inches of insulation from the end of each wire using your wire strippers.
To ensure your cables are secure, fasten the screws on the clamps. Make sure you don't secure them excessively, as it may lead to harm. With a plastic junction box, you won't need to be concerned about tightening as these boxes typically feature spring tabs.
Focus on Your Cables
While fastening your cables, consider the state of your wires. The tip of each wire must be tidy, straight, and undamaged. No more than 3/4 inch of wire should be visible past the insulation. If any wires are broken, trim them or remove insulation with wire strippers as necessary before proceeding to the following step.
Step 7: Connect the Wires After the wires are fixed, it's time to connect them. For this, you must utilize the approved wire connectors specified in the manufacturer's guidelines. The initial wires that connect are exposed copper. These are insulated with green materials. If you possess a metal junction box, keep in mind that a pigtail of 6 inches with the same type of ground wire will be necessary. Attach this to the ground wire connection; afterward, link the other end of the pigtail to the ground screw on the box. To connect grounding wires, you usually require green wire nut connectors. Then, connect the neutral (white) wires together. Next, connect the hot (black) wires. Utilize a wire nut or an authorized connector for every pair of wires. If you possess hot red wires, you will need to connect them together too. After completing, verify that all wires are properly connected. To achieve this, gently pull on each wire to check their security.
Step 8: Complete Your Setup The final step is to thoughtfully place the wires into your junction box. It's preferable to incorporate them. Cover everything with your box lid and fasten it with two screws. The code specifies that the cover must be a solid "blank" without any holes. After completing this, you are prepared to reclaim your power. Simply activate your circuit breaker, and you’re done. Safeguard Your Electrical Connections Using a Junction Box A junction box is essential whenever there is an electrical connection, as all connections need to be properly enclosed. When installing our junction boxes, it is crucial to adhere to all codes, thoroughly read and follow all manufacturer instructions, and execute each step with care. Always ensure that there is no voltage present before you begin handling any wires. If you cannot manage the steps, it’s advisable to hire an expert who can carry out the process on your behalf.
Good lighting is very important in modern labs.You are business professionals.You know that efficiency and productivity are key to success.People ofte...
Jun 29,2026 / Industry news
In healthcare, infection control is a top priority. Hospitals and clinics always look for new ways to keep patients safe. They also try to lower the n...
Jun 28,2026 / Industry news
Healthcare workers must keep a sterile environment. This is not just a good practice. It is a necessity. Hospital instrument enclosures protect medica...
Jun 28,2026 / Industry newsOnline
Provider of Complete Metal Manufacturing Solutions
+86 18939857433
1188 Jiu Ye Road, Shanghai, China
11561 N Lamar Blvd,Austin,Texas,United States of America,78753
Gyeongin-ro 56-gil 8, ,3F jjbeauty,Guro-gu,Seoul,Guro-gu,Seoul,Republic of Korea
Top
Copyright © 2025 Shinging Technology Co., Ltd.,
Power By Bontop